Video Editing on Linux - Action Cam SCUBA Diving Videos
I have an action cam (Sony FDR-X3000), and often document my adventures with it. But making SCUBA videos pretty is hard, because cameras are not optimised for the underwater environment.
Also, I use Linux, and video editing on Linux is an interesting character-building exercise. I have figured out a workflow that works reasonably well for dive videos, so I thought why not share it?
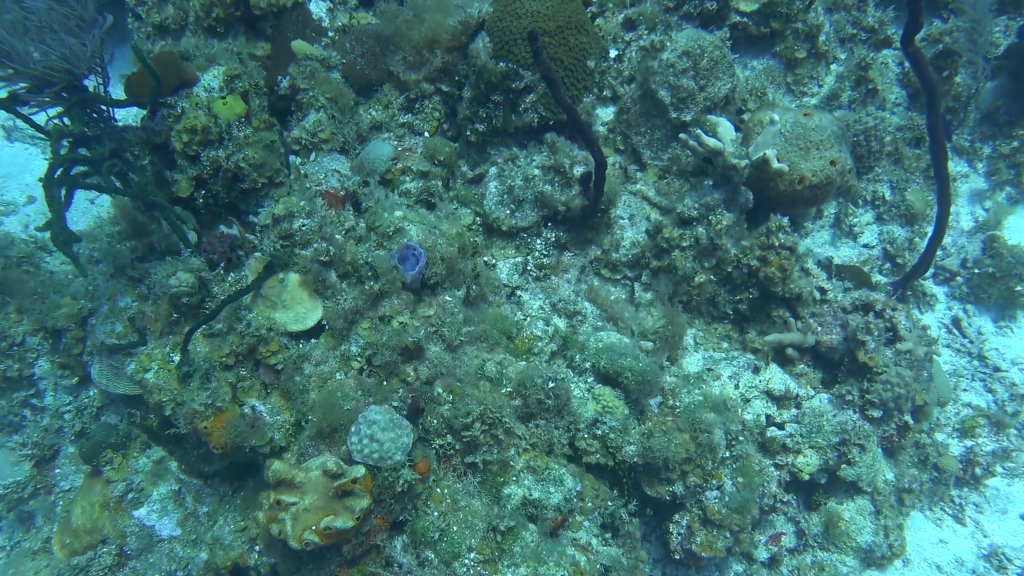
Left: Before. Right: After.
For me, dive videos have 2 main problems:
- The Shake. I am still experimenting with different ways of using the camera underwater, but for this one, I was just holding the camera with a pistol grip stabiliser. It’s not the best, and despite the camera’s highly-touted optical image stabilisation function, the video still came out very shaky (I don’t blame the camera – if I can’t fix it fully even in post-processing, it’s not reasonable to expect the camera to be able to magic it!).
- The Blue (and green). Red light does not penetrate well under water at all, and that’s why below about 5m (this video was mostly shot at ~20m), everything looks blue and green. The camera does have an underwater white balance mode that helps with it, but can we do better in post-processing?
The Starting Point
As mentioned above, the footage was shot with a Sony FDR-X3000, in 4K mode, with underwater white balance, and handheld.
See the left half of the video for what the original footage looked like. As promised, it’s shaky and blue, but with very good clarity (a bit less now that YouTube has re-encoded it).
Programs
Unfortunately Linux does not have any of the commercial video editing programs that everyone love, but it does have Kdenlive, which is more than powerful enough for our purposes, and the epic FFmpeg – the command line video editor (+converter/streamer/etc) that can do just about anything under the sun…
Here I am using FFmpeg to solve both The Shake and The Blue, and Kdenlive to do the cutting.
FFmpeg
It’s one of those 20 years old UNIX programs that can summon a demon and make you a sandwich if you are well-versed in its 1000 flags and convoluted syntax, but you won’t be able to do anything useful without a solid 20 minutes of RTFMing. Well, I did the RTFMing and summoned the demon!
Most FFmpeg commands consist of input specification, a series of filters (how you want to change the video), and then some encoder settings to write to an output file.
Colour Correction
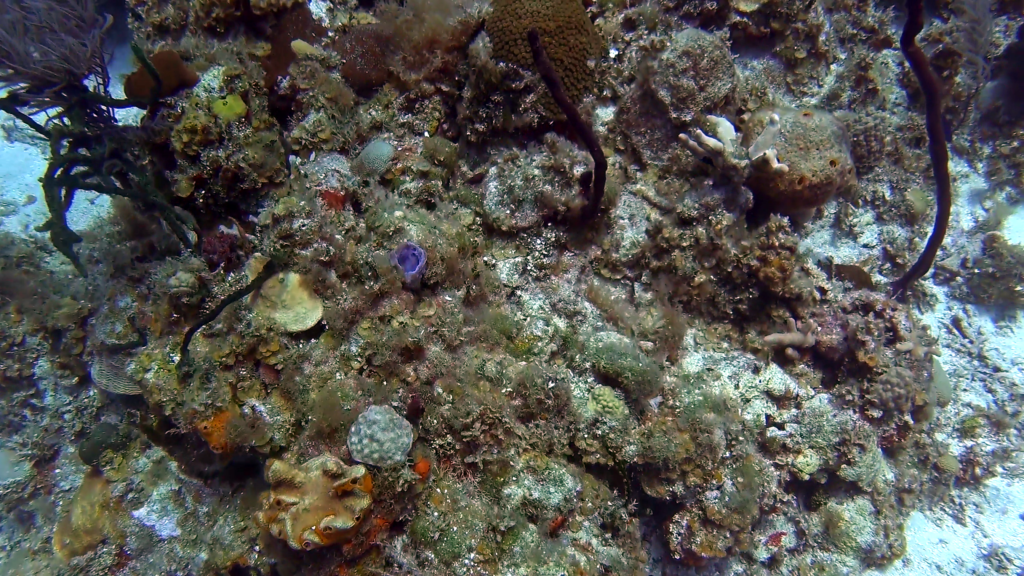
To work out how to add red back into the video, we have to first figure out what the colour distribution looks like in the original. For that, I opened the video in VLC, looked for a frame with as much colour as possible, and took a snapshot.
I then opened it up in GIMP, and used the “Colours -> Levels” tool to see what the per-channel histograms look like.
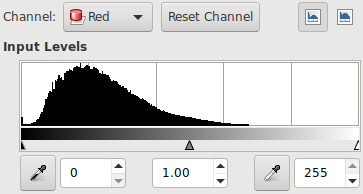
As we had expected, red levels are very low, and that’s what’s giving the image a heavy blue-green tint. Now we can adjust the arrows underneath the diagram to rescale each channel so that they only cover the range actually used to give maximum contrast… or we can just be lazy and click the “Auto” button, which does the same thing!
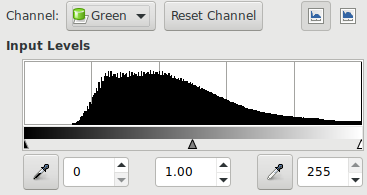
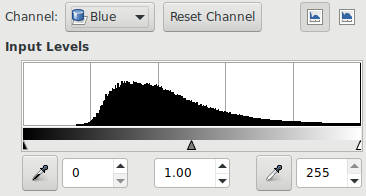
Auto leveling gave me this:
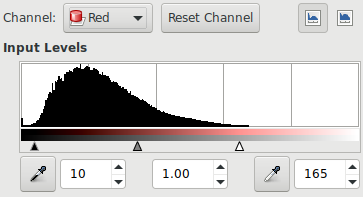
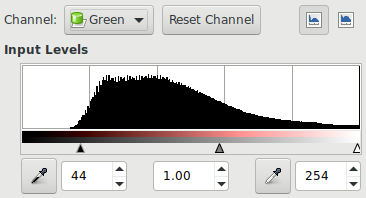
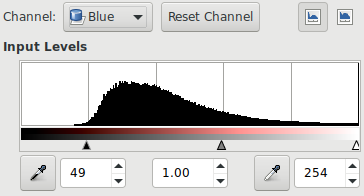
Write down the numbers under each histogram – they are what we came here for.
And now, the image looks much better:
Auto-levelling is great, but still results in loss of resolution in the red channel due to the reduced range, so at least theoretically, adding a physical red filter (which reduces blue and green light, and force the camera’s auto-exposure to increase exposure/gain) should result in better image quality. Will try that next time!
Back to FFmpeg
In the case of de-shaking, two passes are needed – first pass analyzes the video and computes motion vectors (basically it tries to figure out how each part of the video is moving frame to frame), and the second pass applies necessary corrections.
I also want to crop out 15% from each edge because I was on wide angle setting, and there’s significant fish-eye distortion near the edges.
First pass:
ffmpeg -i ${INPUT} -vf "crop=7*in_w/10:7*in_h/10:1.5*in_w/10:1.5*in_h/10,vidstabdetect=accuracy=9:result=transform_vectors.trf:shakiness=8:mincontrast=0.2" -f null -
This one should be pretty self-explanatory. Take the input, crop it to 7/10 width and 7/10 height, starting from x=1.5/10 width and y = 1.5/10 height, then run the vidstabdetect (video stabilisation detect) filter to estimate motion vectors. The included settings are ones I found work well in this case. They are explained here. There is no output video here. The vidstabdetect filter writes the motion vectors out to a text file specified as a filter parameter.
This is a slooooow process. On my 16-core 2x Xeon E5-2670 machine it was only able to do 3-5 frames per second, so the whole 23 minutes footage took about 3 hours. The filter is not GPU-accelerated, and this is exactly the sort of thing a GPU would do very well.
Second pass:
ffmpeg -i ${INPUT} -vf "crop=7*in_w/10:7*in_h/10:1.5*in_w/10:1.5*in_h/10,vidstabtransform=input=transform_vectors.trf:smoothing=30,unsharp,colorlevels=rimin=0.04:gimin=0.17:bimin=0.19:rimax=0.65:gimax=1.0:bimax=1.0,scale=1920:1080" -c:a aac -b:a 320k -c:v libx264 -crf 18 -preset slow -pix_fmt yuv420p ${INPUT_BASE}_stabilised_1080p.mp4
In the second pass, we use the sibling filter vidstabtransform to actually transform the video using the motion vectors computed in the first pass. I also added the “unsharp” filter as recommended by the vidstab author because I’m a good boy. This is also where we apply the colour level correction using the numbers we got from GIMP earlier. Each channel has a minimum and a maximum to scale from. Use the numbers from GIMP, divided by 255.
This time we do have an output video file – to be encoded using libx264 (very high quality open source library for encoding H.264 videos, which is the industry standard encoding at the moment). At this point we downscale to 1080p. Why shoot in 4K if we are downscaling anyways? Because this allows the stabilising filter to work in 4K. Stabilising requires zooming in so that black pixels won’t be shown on edges when the image is rotated and translated, and that means some pixels will be thrown away. By shooting in 4K, we make sure we still have enough resolution to work with in the end to get a high quality 1080p video.
This took another 5 hours on my machine for the 23 minutes footage.
Side by Side:
Just for fun, here is the command I used to produce the “side by side” video above:
ffmpeg -i ${INPUT} -i ${INPUT_BASE}_stabilised_1080p.mp4 -filter_complex '[0:v]crop=3.5*in_w/10:7*in_h/10:1.5*in_w/10:1.5*in_h/10,scale=960:1080[left];[1:v]crop=in_w/2:in_h:in_w/2:0[right];[left][right]hstack[stack]' -map [stack] -map 0:a -c:a copy -c:v h264_nvenc -preset slow -profile:v high -b:v 20M -rc vbr side_by_side.mp4
It crops the first video in half, scales it to 960×1080, and do the same with the second video, then stack them horizontally. This time I used the NVENC GPU encoder just for fun. Would not recommend it for anything “serious”. It’s very fast and not very high quality. Really only useful if you are doing things like live game streaming where you need to encode into multiple resolutions at the same time with minimal latency and low CPU usage. I would use libx264 for anything serious, though it does take a while if you want a high quality encode and don’t have 16 cores.
Cutting
I did all the cutting in Kdenlive. I won’t write much about it because it’s a nice and simple GUI program, and I figured it out without even reading the manual!
Results
As you can see in the side-by-side comparison, the result is much better than the original, but stabilisation is still not perfect. There’s quite a bit of distortion going on still. I believe it’s because vidstab only looks for 2D affine transformations, and there’s parallax error not being accounted for. It would probably have to be projected into 3D to fix that, which is probably too slow to run on a CPU. Hey, I’ve always wanted to do some GPU programming…